Introduction
In the ever-evolving world of gaming and productivity peripherals, mechanical keyboards have become essential tools for enthusiasts and professionals alike. Among these, the Aula F75 stands out as a compact, versatile 75% layout keyboard that combines affordability with high-end features like hot-swappable switches, RGB lighting, and multi-device connectivity. This keyboard caters to gamers seeking responsive inputs, typists desiring a satisfying tactile experience, and multitaskers who switch between work and play seamlessly. However, to truly harness its potential, users often turn to the dedicated aula f75 software, which unlocks advanced customization options beyond the hardware’s built-in capabilities.
The aula f75 software serves as the control center for personalization, allowing adjustments to lighting effects, key assignments, and macro programming. It’s particularly valuable for those who want to tailor their setup to specific needs, whether optimizing for competitive gaming or streamlining office workflows. In this comprehensive article, we’ll delve into the compatibility aspects, system requirements, and practical tips for getting the most out of this tool. By understanding these elements, users can avoid common pitfalls and elevate their keyboard experience. We’ll also explore how the software integrates with various devices and operating systems, providing a holistic view for potential buyers and current owners.
Mechanical keyboards like the Aula F75 are designed with modularity in mind. The 75% layout retains essential keys while omitting the numpad for a more desk-friendly footprint. Features such as gasket-mounted structure for softer typing feel, PBT keycaps for durability, and a multifunctional knob for quick controls add to its appeal. But without software support, some of these elements remain limited to default settings. That’s where the aula f75 software comes in, bridging the gap between hardware and user preference. It’s worth noting that while the keyboard itself is compatible with multiple platforms, the software has specific constraints that we’ll cover in detail.
As we progress through this guide, expect in-depth explanations, step-by-step instructions, and real-world examples to illustrate key points. Whether you’re a first-time mechanical keyboard user or a seasoned modder, this article aims to equip you with the knowledge to maximize your Aula F75’s capabilities. Let’s start by examining the compatibility landscape, which is crucial for determining if this setup fits your ecosystem.
Compatibility Overview
Compatibility is a cornerstone of any peripheral software, ensuring it works harmoniously with your hardware and operating system. For the Aula F75, the software is primarily designed for Windows environments, reflecting the brand’s focus on PC gamers and users. This means seamless integration with Windows 10 and later versions, where the aula f75 software can detect the keyboard automatically upon connection and provide full access to its features. However, this Windows-centric approach leaves gaps for other platforms.
On macOS, the story is different. There is no official aula f75 software available for Apple’s operating system, which might disappoint Mac users. That said, the keyboard itself functions well on Macs without the software, thanks to built-in modes. By pressing Fn + E, you activate Mac mode, which remaps keys like Command and Option for native compatibility. The multifunctional knob handles volume control and mute, while RGB adjustments can be made via onboard shortcuts like long-pressing to toggle modes. For advanced remapping, third-party tools such as Karabiner-Elements can step in, offering software-independent customization. This workaround allows Mac users to enjoy the hardware’s core benefits, though they miss out on the full suite of RGB profiles and macro editing.
Linux compatibility presents another layer. While not officially supported, the Aula F75 keyboard connects via USB or Bluetooth and works as a standard input device. Open-source alternatives like OpenRGB can handle RGB lighting control, providing a partial substitute for the official software. Users on distributions like Ubuntu or Fedora might need to tinker with kernel modules for optimal wireless performance, but basic typing and media controls remain intact. Community forums often share scripts for macro emulation, making it feasible for tech-savvy individuals.
Mobile devices add to the compatibility mix. The Aula F75 supports Bluetooth connectivity with iOS 12+ and Android 6.0+, allowing pairing with smartphones and tablets for on-the-go use. However, there is no mobile app equivalent to the PC software, so customizations must be done on a Windows machine first, with settings stored onboard the keyboard. This is ideal for hybrid setups, like using the keyboard with a tablet for note-taking or a phone for light gaming. Multi-device pairing (up to three) enhances this flexibility, letting you switch between a PC, phone, and tablet effortlessly.
Hardware-wise, the software is compatible with various Aula F75 variants, including the standard, Pro, Max, and Epomaker collaborations. These models share core features but differ in aspects like onboard storage for profiles or advanced macro depth. Ensuring your specific model matches the software version is key to avoiding detection issues. Additionally, the keyboard’s tri-mode connectivity (wired USB-C, 2.4GHz wireless, Bluetooth) ensures broad hardware compatibility, but software customization requires a wired connection during setup.
In summary, while the software excels in Windows environments, cross-platform users can rely on the keyboard’s robust hardware features and third-party solutions. This balance makes the Aula F75 a versatile choice, provided you align your primary device with its strengths.
System Requirements
Before diving into installation, it’s essential to verify your system meets the necessary requirements. These specs ensure smooth operation and prevent performance hiccups. The baseline for running the software includes Windows 10 or later (64-bit preferred), an Intel Core i3 processor or equivalent, at least 4GB of RAM, and 50MB of free disk space. A functional USB port is also required for initial setup, as wireless modes aren’t supported during configuration.
Why these specs? The software involves real-time rendering of RGB previews and macro recording, which can be resource-intensive on older hardware. For instance, with only 2GB RAM, you might experience lag when switching profiles or applying complex lighting effects. Upgrading to 8GB or more enhances multitasking, especially if you’re running games or productivity apps alongside. Processor-wise, an i3 handles basic tasks, but for users with macros involving delays or multiple sequences, a stronger CPU like an i5 reduces processing time.
Storage is minimal, but consider the ZIP file download size—around 20-30MB—plus any exported profiles. Keeping your OS updated is crucial, as patches often resolve USB detection bugs or driver conflicts. Antivirus software can sometimes flag the installer as a false positive, so whitelisting from official sources is advised.
For optimal performance, pair the software with a modern setup: Windows 11, 8GB RAM, and a SSD for faster load times. This configuration allows seamless integration with other peripherals, creating a cohesive ecosystem.
Download and Installation Guide
Getting started with the software is straightforward, but following best practices ensures a hassle-free experience. Always download from official sources like the Aula website or Epomaker’s support page to avoid malware. Search for “Aula F75 driver” on these sites, and select the latest version (e.g., v2.0 or higher for 2025 compatibility).
Once downloaded, extract the ZIP file using built-in Windows tools or third-party apps like 7-Zip. Right-click the setup.exe and run as administrator to grant necessary permissions. Follow the wizard: accept terms, choose install location, and complete the process. Restart your PC afterward for changes to take effect.
Connect the keyboard in wired mode via USB-C. Launch the software—it should detect the device automatically, displaying the layout. If not, reconnect or try another port. Verification in Device Manager under “Keyboards” confirms success.
Tips for smooth installation: Disable antivirus temporarily, close conflicting apps like other RGB controllers, and ensure no firmware updates are pending on the keyboard.
Customization Tips
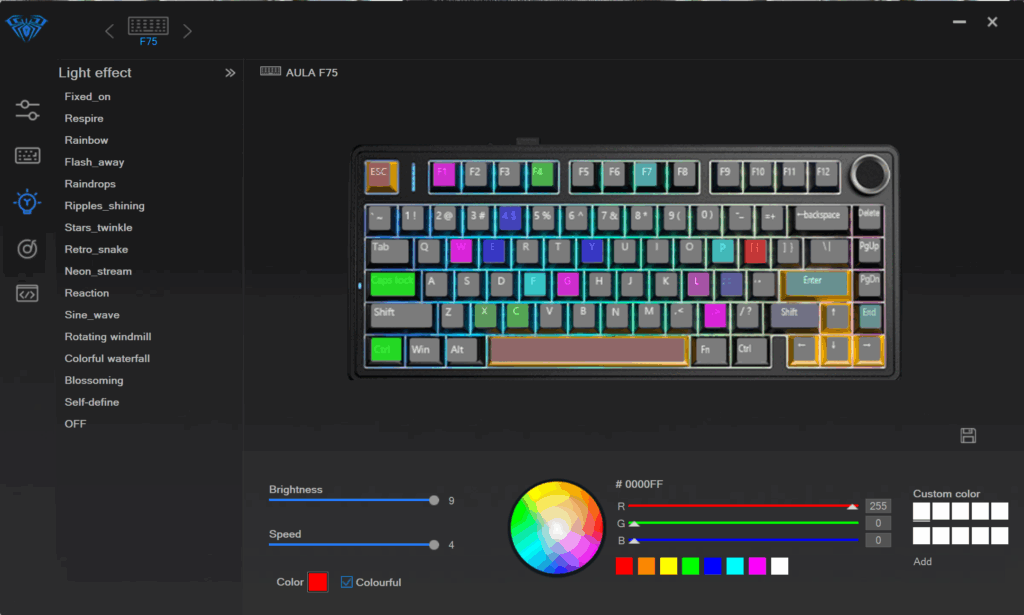
The real magic happens in customization. The software’s interface features tabs for lighting, keys, macros, and settings. Start with RGB: Choose from modes like static, breathing, or reactive, adjusting colors per key for themed setups. For gamers, reactive lighting highlights WASD during play.
Key remapping lets you swap functions—e.g., assign screenshot to a function key. Macros automate sequences: Record a combo for FPS games or Excel shortcuts for work. Save multiple profiles for quick switches.
Advanced tips: Tune polling rate to 1000Hz for low latency, customize the knob for media or scrolling. Export profiles as backups. Gradually build setups to avoid overload.

Advanced Usage and Optimization
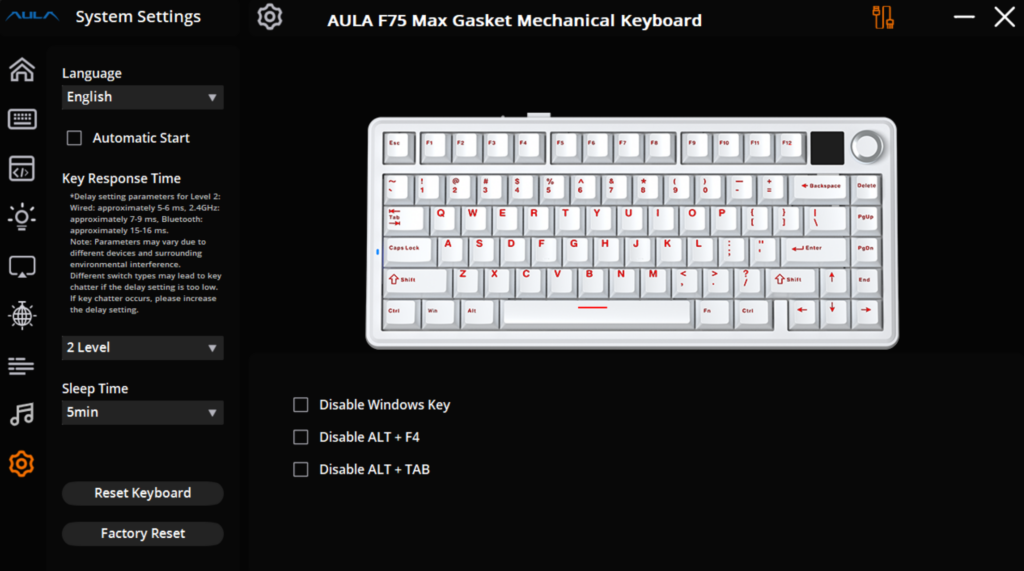
Beyond basics, optimize for specific scenarios. In gaming, enable game mode to lock Windows key, preventing accidental exits. For productivity, map macros to copy-paste or app launches.
Firmware updates via software add features like improved battery life in wireless mode. Monitor usage: Dim RGB for extended sessions to save power.
Integrate with tools like AutoHotkey for enhanced macros. Community mods offer custom themes, expanding possibilities.
Troubleshooting Common Issues
Issues arise, but solutions are simple. Detection failure? Use wired mode, run as admin, or restart. Settings not saving? Apply changes explicitly. Key conflicts? Reset to defaults.
For wireless glitches, pair anew. If software crashes, reinstall after uninstalling via Control Panel.
FAQ
Q: Is the aula f75 software compatible with macOS? A: No, it’s Windows-only, but the keyboard works on Mac with built-in remaps.
Q: What are the minimum system requirements? A: Windows 10, i3 processor, 4GB RAM, 50MB space.
Q: How do I download the software safely? A: From official Aula or Epomaker sites.
Q: Can I use the software on mobile devices? A: No, but onboard settings apply after PC customization.
Q: What if the software doesn’t detect my keyboard? A: Ensure wired connection, run as admin, try different ports.
Q: Are there alternatives for non-Windows users? A: Yes, like OpenRGB for RGB or Karabiner for remaps.
Q: How often should I update the software? A: Check quarterly for new features and bug fixes.
Q: Can I create multiple profiles? A: Yes, save and switch between them easily.
Q: What features does the Pro version software add? A: Deeper macros and more onboard storage.
Q: Is the software free? A: Yes, included with the keyboard purchase.
Conclusion
Mastering the Aula F75 through its software transforms a good keyboard into a personalized powerhouse. By adhering to compatibility guidelines, meeting requirements, and applying tips, users can achieve peak performance. Whether gaming or working, this setup delivers value. Explore, experiment, and enjoy the enhanced experience.